
The rotary knob in Flight Deck ONE is a touch-optimized control that drives X-Plane commands and datarefs. It supports different gesture modes, dual-knob behavior, push/pull actions, and tuning options so you can adapt it to your flying style.
Gesture Modes
Gesture modes control how your finger movement is translated into + (increase) and − (decrease) steps. You can choose between two modes: Radial and Linear.
Radial Mode
Radial mode uses an intuitive radial gesture that mimics rotating a physical knob:
- Touch the knob control
- Drag your finger away from the knob center to a comfortable distance
- Rotate your finger around the knob center in circular motions
- The further your finger is from the center, the finer the control
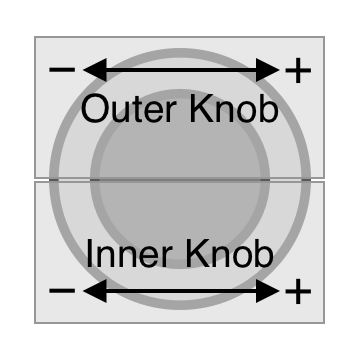
Dual Knob Controls
For controls with two concentric knobs (like frequency adjusters):
- Slide your finger closer to the knob to control the inner knob
- Slide your finger farther from the knob to control the outer knob
Customization Options
Activation Distance
- Controls how far you need to drag before rotation tracking begins
- Lower values = rotation starts sooner
- Higher values = requires more initial drag distance
Inner Zone Radius
- Defines the boundary between inner and outer knobs
- Lower values = smaller inner zone, easier to reach outer knob
- Higher values = larger inner zone, easier to stay on inner knob
Best for: users who want a realistic, knob-like behavior.
Linear Mode
Linear mode uses direct drag gestures for precise control, with three sub-modes to choose from:
Two-Axis (Dominant Axis)
In Two-Axis mode, both vertical and horizontal drags are supported. The knob automatically chooses the dominant axis of your drag:
- Drag up → increment
- Drag down → decrement
- Drag right → increment
- Drag left → decrement
If you drag diagonally, the knob locks onto the axis that dominates your movement. This prevents jitter between vertical and horizontal directions.
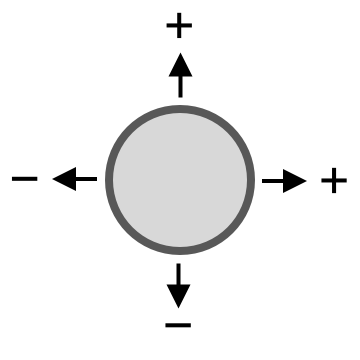
Best for: fast, forgiving adjustments anywhere on the knob surface.
Vertical-Only
In Vertical-Only mode, only the up/down drag direction is used:
- Drag up → increment
- Drag down → decrement
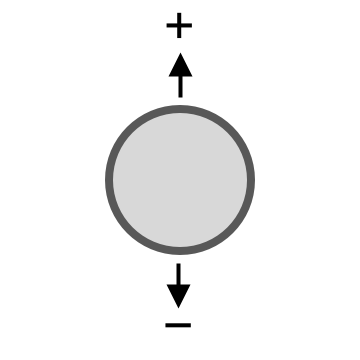
Best for: tight vertical layouts or when horizontal drags tend to clash with nearby controls.
Horizontal-Only
In Horizontal-Only mode, only the left/right drag direction is used:
- Drag right → increment
- Drag left → decrement
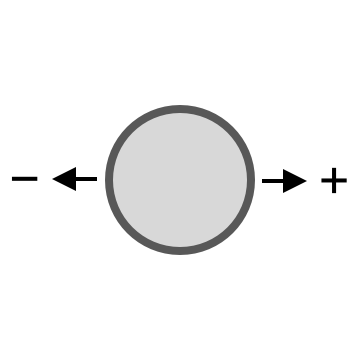
Best for: rows of knobs or narrow panels where vertical motion is constrained.
Drag Area Mode (for Linear mode only)
Use Drag Area Mode to decide how a double rotary (outer + inner knob) selects which knob your drag will control.
Natural
- The control behaves like a physical double knob.
- Knob selection is determined by where you drag relative to the rings and the current gesture mode.
- Recommended if you prefer the classic, ring-based interaction.
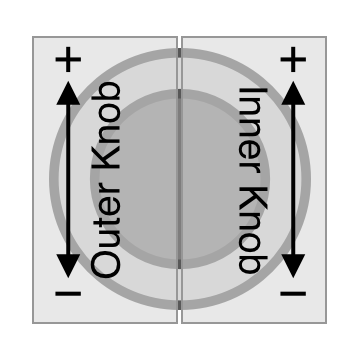
Split
- The drag area is divided into two halves so you can target a knob by where you start your drag.
- Which half selects which knob depends on the Gesture Mode:
- Vertical Only
left half = outer, right half = inner - Horizontal Only
upper half = outer, lower half = inner - Two Axis
the app detects your dominant drag direction, then applies the corresponding split:- Vertical drag:
left = outer, right = inner - Horizontal drag:
upper = outer, lower = inner
- Vertical drag:
- Vertical Only
Note: Split is available when Gesture Mode is Two Axis, Horizontal Only, or Vertical Only. In Natural mode, Drag Area Mode is always Natural.
Dual-Knob Smart Mode (for Linear mode only)
Dual knobs are common on radios and autopilots (for example, to control both coarse and fine increments). Smart Mode is an assist feature that makes switching between the inner and outer knob faster on a touch screen.
This allows you to quickly adjust both parts of a value (like MHz and kHz, or large and small increments) without needing to precisely target the inner versus outer area each time.
1 Standard
Smart Mode uses two timing thresholds:
- Lower threshold → minimum delay required before a retouch can trigger a knob swap
- Upper threshold → maximum delay allowed for a retouch to still count as a swap
How it behaves
- You perform your first drag (inner or outer knob).
- If you release and retouch again after the lower threshold but before the upper threshold,→ Smart Mode swaps to the other knob.
- If you retouch too early (before the lower threshold), nothing happens — you stay on the same knob.
- If you retouch too late (after the upper threshold), Smart Mode expires and the next drag does not swap.
Example
Change MHz → then change kHz
- Turn the big knob to set MHz (118 → 119).
- Lift your finger.
- Touch the knob again after a natural short pause.
- Now the small knob is active → adjust kHz (119.00 → 119.05 → 119.10).
Change kHz → then go back to MHz
- Adjust kHz.
- Lift your finger.
- Touch again after a small pause.
- You’re back on the big knob → adjust MHz again.
That’s it. Each pause switches to the other knob.
2) Retouch-Only
When the lower threshold is set to the minimum allowed value, Smart Mode switches to a different mode:
How it behaves
- You perform your first drag on a knob.
- If you retouch quickly (within the upper threshold),→ Smart Mode immediately swaps to the other knob.
- After this retouch, Smart Mode stops trying to maintain a dual-window behavior and falls back to a simple cycle:
- Retouch rapidly → swap
- Wait longer than the upper threshold → Smart Mode expires (similar to Smart Mode OFF)
Example
Change MHz → then change kHz
- Turn the big knob (MHz).
- Lift your finger and tap again quickly.
- Now the small knob is active → adjust kHz.
Change kHz → back to MHz
- Adjust kHz.
- Lift your finger and tap quickly again.
- You’re back on the big knob → adjust MHz.
This version is basically: turn → quick tap → turn → quick tap → turn → quick tap.
Push, Pull and Long Press
Many rotary knob controls support push and pull interactions for additional functionality:
Push
- Quickly tap the center of the knob
- Common uses:
- Toggle between modes or settings
- Activate/deactivate a feature
- Confirm a selection
Pull
- Press and hold the center of the knob for a brief moment, longer than a push, but shorter than a long press, typically between 0.3 and 1 second
- A medium-duration press that falls between a quick tap and an extended hold
- Common uses:
- Access secondary functions
- To simulate the pull action on some panels (Airbus and MD-11)
Long Press
- Press and hold the knob center for an extended period, typically above 1 second
- Typically used for:
- Accessing advanced settings
- Quick reset functions
- Context-specific actions
Note: The availability of push, pull, and long press gestures depends on the specific control and what the aircraft system supports. Not all knobs implement all interaction types. Refer to the specific panel or aircraft documentation for details on which gestures are available.
Troubleshooting
- The knob feels backwards: turn on Invert direction in the knob settings.
- Diagonal drags behave strangely: try Vertical-Only or Horizontal-Only, or use Natural mode for more quadrant-based behavior.
- Inner/outer knob is hard to hit: enable Smart Mode so you can alternate drags instead of aiming precisely.
- Changes are too slow or too fast: adjust the Sensitivity.
With the right combination of gesture mode, sensitivity, and Smart Mode, the rotary knob can closely match the way you prefer to interact with avionics, while staying efficient on a touchscreen.